- Jul 26 Tue 2022 14:52
-
ubuntu 20.04基礎安裝與設定

- Jun 16 Wed 2021 23:18
-
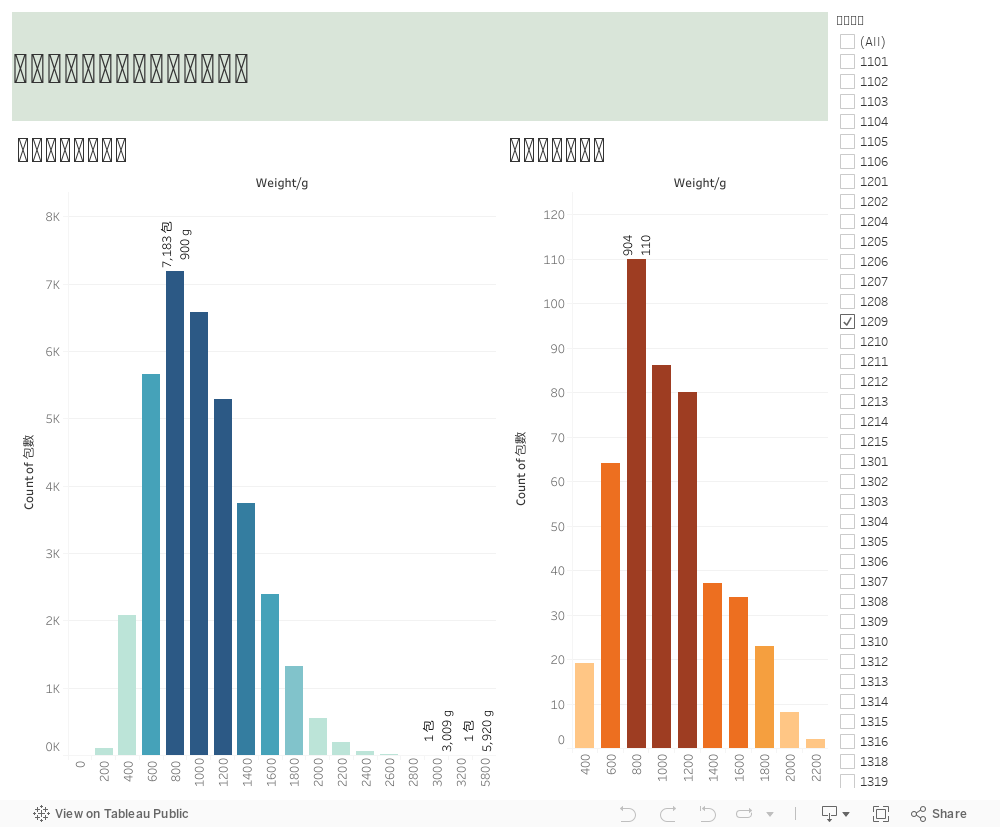
練習-外站圖表插入
https://public.tableau.com/views/9-_16238324831150/sheet3?:language=zh-TW&:increment_view_count=no&:embed_code_version=3&:loadOrderID=0&:display_count=n&:origin=viz_share_link
- Mar 10 Wed 2021 15:05
-
Win10中更換Samba帳號

參考資料:
https://www.ichiayi.com/tech/winxp_samba
https://freetoad.pixnet.net/blog/post/23509679
http://arbitrarytsai.blogspot.com/2019/10/fix.html
- Mar 10 Wed 2021 14:07
-
ubuntu 安裝Samba
安裝Samba:
參考文獻:
https://magiclen.org/ubuntu-server-samba/
https://tsaiyuyan.github.io/2019/04/09/ubuntu-she-ding-samba-fen-xiang-dang-an/
https://www.itread01.com/content/1550441893.html
參考文獻:
https://magiclen.org/ubuntu-server-samba/
https://tsaiyuyan.github.io/2019/04/09/ubuntu-she-ding-samba-fen-xiang-dang-an/
https://www.itread01.com/content/1550441893.html
- Feb 08 Mon 2021 15:47
-
Ubuntu 20.04 安裝MySQL 8.0.24
- Feb 03 Wed 2021 17:02
-
ubuntu(linux) 目錄繼承父系權限
參考文獻:http://www.unixlinux.online/unixlinux/linuxjc/linuxjc/201702/35313.html
實際用法:使用setfacl和getfacl指令
實際用法:使用setfacl和getfacl指令
- Jan 25 Mon 2021 11:03
-
Event ID 10016 錯誤

- Jan 11 Mon 2021 17:54
-
ubuntu 20.04隱藏關機功能

參考文獻:https://vivaldi.club/d/11869
# vi /etc/polkit-1/localauthority/50-local.d/restrict-login-powermgmt.pkla
- Jan 11 Mon 2021 09:57
-
ubuntu 安裝MatLab R2020b

參考資料:https://linuxconfig.org/how-to-install-matlab-on-ubuntu-20-04-focal-fossa-linux
需在GUI介面下進行安裝。
- Jan 08 Fri 2021 10:41
-
ubuntu adduser+home
# adduser stduser
Adding user `stduser' ...
Adding new group `stduser' (1004) ...
Adding new user `stduser' (1004) with group `stduser' ...
Creating home directory `/home/stduser' ...
Copying files from `/etc/skel' ...
New password:
Retype new password:
passwd: password updated successfully
Changing the user information for stduser
Enter the new value, or press ENTER for the default
Full Name []: Standard User Template
Room Number []:
Work Phone []:
Home Phone []:
Other []:
Is the information correct? [Y/n] y
- Dec 30 Wed 2020 11:40
-
Ubuntu讀取exFat格式的外接HD並鏡像備份
參考文獻:https://magiclen.org/ubuntu-exfat/
https://royalprogrammer.wordpress.com/2018/01/27/exfat-format/
https://blog.xuite.net/beavisliu/blog/15341561
1. 在ubuntu上安裝支援exfat格式的軟體
https://royalprogrammer.wordpress.com/2018/01/27/exfat-format/
https://blog.xuite.net/beavisliu/blog/15341561
1. 在ubuntu上安裝支援exfat格式的軟體
- Dec 25 Fri 2020 16:09
-
Ubuntu安裝rsync配合NAS

